Monday, 21 November 2016

How To Open/Create A Payza Account In Less Than 2 Minutes

Like Paypal, Payza is a genuine, secured, worldwide and famous online payment processing platform for both individuals and merchants who carry out online businesses.

In many ramifications, it is operated in similar ways as PayPal and you can easily fund, withdraw and request for fund with Payza with just an email address that serve almost like an account number.

But unlike Paypal, Payza is available in over 190 countries without much limitations and restrictions.
How-to-create-a-Payza-account

In fact we consider Payza as best alternative to Paypal because it is secured, flexible and with very easy to operate interface.

Payza was formerly known as AlertPay, before at some point there was a transition to the current Payza.

In today’s post, we are going to be taking through the steps of creating your first Payza account in less than 2 minutes.

Must Read: How to create a Bitcoin wallet

Opening a Payza account is fast, free, easy and simple, and without further ado, follow the steps bellow to open a Payza account.

1.  Go to Payza

2.  While on Payza, click on the signup button
Payza-account-signup

3.  On the next page, select your country from the drop-down menu and below it, choose either Personal for personal account or Business for Business account
Payza-account-select-country-and-account-type-page

4.  Immediately after you choose Personal or Business, you will be taken to the next page where you will fill in your name, email and password; fill in all the required information there and make sure your password consist of at least a Capital LETTER and then click the Get Started button below the page.
Payza-account-get-started-page

5.  A verification link will be sent to the email that you provided; now log into your mail and click on the verification link sent.
Payza-account-email-verification-page

Hurray! You have just created a Payza account.

Other things to note

When you log in or have been taken into your Payza account, you need to complete your profile to have full access to Payza account.

Payza allows easy Wire Transfer, credit card and Bitcoin funding and withdrawal in most countries and you can also do so via carefully selected Payza fund exchangers.

How To Create Whatsapp Group With Invitation Link In Less than 1 Minute

Some of you might have seen Whatsapp invitation link requiring you to click and join a particular group created by some other Whatsapp users, and you might have been wondering how you too can create a group on Whatsapp with invitation link.

Whatsapp invitation link provides an easier way of promoting and inviting others to join your Whatassp group.

Formerly, it was quite hectic doing so as you will be required to uninstall your current Whatsapp app and install a Beta version Whatsapp Prime app that can enable you create a Whatsapp group with its own invitation link.
create-whatsapp-group-with-invite-link

Today, we are going to be showing you the steps now involved in creating whatsapp group with invitation link, without needing any 3rd party Whatsapp app.

Presently, you are allowed to add up to 256 members to a whatsapp group and you should be running an updated Whatsapp version, to enable you create a group with invitation link.


Without further ado, below are the steps involved in creating Whatsapp group with invitation link;

•  Launch your updated Whatsapp app 

•  Navigate to the Whatsapp Chats menu if it is not already there

•  Click on the 3 dotted  Whatsapp menu located at the top right corner and select new group

•  Add at list 1 or more participants from the list of contacts on your device

•  Click on the next green icon located at the bottom right of the page

•  Add subject or name the group you are creating and click on the round button with tick to Ok it 

•  On the group that you just created, tap on the group header name to bring up the group info

•  Select the personal icon with plus sign at the top right hand side of the group info

•  You will see the ‘Invite to group via link’ and its icon at the top of the list, select it to see the group Whatapp invitation link

•  You can now tap on copy link to copy the link and start promoting it

Hurray! You have just created a Whatsapp group with invitation link and anybody that sees the link and clicks on it will be added to the group through the link.

Friday, 18 November 2016

[Star Wars] Google And Facebook Help You To Choose Your Side

Attention, Star Wars Fans.
If you are a Star Wars fan like me, then you might be very excited to watch the latest release in the Star wars franchise, Star Wars: The Force Awakens , hitting theaters this Thursday. While this excitement continuous, Internet is giving the pleasure of expressing our interest in the movie, to the whole world, in various ways.
Star-Wars-Featured

Google – Choose Your Side

You might already know that the search engine giant Google, had showed their love for the movie by creating a website for Google account holders. If you have a google account(by default most of us do) , you can head over to that website , and choose either light side or dark side, depending on your Interest. Depending on the side you’ve picked, you would notice the environment of Google apps like Gmail, Calendar, Maps, Chrome changing with that theme and added effects. All Google Apps will display content with color (red or blue) where appropriate, added backgrounds etc. Google even released a video to awaken the force within you.
You can observe some fun things across all Google services like –
  • Gmail – While loading, you could see loading bar looks like a lightsaber with red and blue colors, depending on your chosen side. Themes of the Gmail and Chromecast (if you use one) would get changed.
  • You can download app from playstore for Android were, having lots of fun features like Movie updates, themes, 3D characters, emojis and much more.
  • Chrome – Download Awaken the Force Within extension from web store to experience Fun from your browser like cool backgrounds whenever you open a new tab.
  • StarWars related events would get automatically added to your Google Calendar, you can delete them if you want to
  • The progress bar on YouTube videos would turn into a lightsaber – blue or red, depending on your side.
Fun Tip – Go to Google and type “A long time ago in a galaxy far far away” without quotes and wait for what happens.

Facebook – Change Your Profile Picture

Even though showing support for a movie for Google isn’t that often, Facebook always been a place where people can express their support to certain events by changing their profile pictures with a particular theme. Facebook already allowed their users to support events like Digital India, Paris Attacks, Gay marriage legalization etc. by modifying their profile photo.
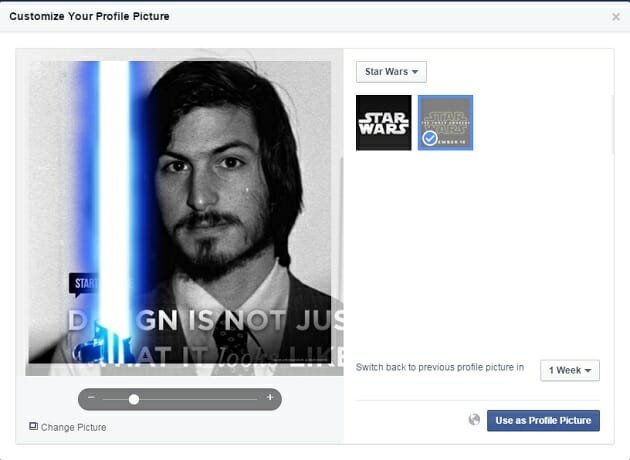
If you are a star wars Fan and using Facebook, then you can add a lightsaber to your profile picture. You can choose a blue one to be on the side of morality and positivity on the light side, or a red one to support dark side in the battle.
Choice is yours.
To choose your side, Go to Star Wars movie’s Facebook page, find the post saying “Change the profile picture to show you are a fan of Star Wars”, which was posted on the page yesterday. Or use this link to go to that post. You would see an option to change your profile picture if you are a star wars fan. Click on “Try It” button.
Facebook-StarWars-Profile-Picture
You can select the light side or the dark side and depending on your pick, you would get blue or red lightsabers on your profile picture. You can adjust the image by zooming in or out, there by changing position of the lightsaber on your photo. You can also set time limit to switch back to your previous profile picture like 1 hour, 1 Day, 1 Week or Never.
Meanwhile, check out news regarding red carpet premier of the movie, or watch the trailer.
No matter how much educated you are, how much strength you have, which side you’ve chosen is the only thing that is going to matter at the end!!
May the Force be with You.

Monday, 18 April 2016

How to Play .VOB Video File On Android

How to Play .VOB Video File On Android
VOB is a file extension that mostly found on DVD disks. A VOB extension can contain anything from audio and video to subtitle and menu information. Unfortunately, it is a kind of file format that are not supported by the default Android video player.
To be able to play .VOB files, you need to install a third-party video player, which can play various formats including .VOB format, in your Android device. One of the best Android video player apps to play .VOB file is Wondershare Player. Wondershare player is a free media player that lets you play video and audio files in all popular media file format like AVI, FLV, MKV, WMV, VOB, MOV, RM, RMVB, ASF, MP3, WMA, AAC, FLAC, M2TS, F4V, 3GP, and more.
It also supports subtitles embedded video files, such as .SSA, .SMI, .SRT, .SUB, .MPL, .PSB, and .TXT.

How to Play .VOB Video File on Android using Wondershare Player

  1. Download and install Wondershare player app on your Android phone or tablet
  2. Once installed, launch the app
  3. On the Local menu, tap on the ‘three horizontal lines’ that are placed at the top left corner of the screen and then tap on ‘Gear’ icon to open the settings menu.
  4. wondershare player pic1
  5. In the Settings menu, tap on ‘Decoding Mode’ option.
  6. wondershare player picture 2
  7. Now, you’ll see a number of file formats which are supported by Wondershare player. Find ‘VOB’ format and tap on it and then check the ‘Auto’ option. Done!
  8. wondershare player picture 3
    Now, Wondershare Player will start supporting .VOB video files in your Android phone and you can start playing the video file without any interruption.

How to Use Whatsapp on PC Using Airdroid

How to Use Whatsapp on PC Using Airdroid
WhatsApp is one of the best mobile messaging apps that allow you to chat with your friends and family for free. With this app, you can send text and voice messages, share pictures, audio notes, videos, location, and many more.
However, Whatsapp is only available for mobile platforms like Android, iOS, Windows phone, Symbian and Blackberry. Although WhatsApp has not been created for PCs, there are ways to run it on PC and use it.
If you’re looking for a great and easy way to run Whatsapp on your PC, then you should give Airdroid a try. Airdroid is free Android device manager app that allows you to transfer files between your Android phone and PC via WiFi. Apart from that, it also allows you to mirror your Android device to PC, which means you can interact with all the apps installed, including WhatsApp. Now let’s see how to use Whatsapp on PC using Airdroid.
  1. Download and install AirDroid on your Android phone
  2. Sign in into the app or Sign up with a new account.
  3. Once you’ve signed in, the app will ask you to enable real time notifications on your PC. Tap on ‘Enable’ button.
  4. airdroid for phone pic1
  5. Enable the Android Notification Mirror feature.
  6. airdroid for phone pic2
  7. Now head over to the www.airdroid.com and download the respective Airdroid client for your Mac or Windows PC from the download links provided.
  8. Install the application on your computer.
  9. airdroid for pc
  10. Sign in to your AirDroid account using the same username and password that you used to sign up on your Android phone.
  11. whatsapp on pc via airfroid
That’s it! Now whenever you receive Whatsapp’s message on your Android phone, the same message will be also displayed on your PC in real time. Click on the message notification to reply.
Please note that you should have your Android phone and PC connected to the same network to get notifications.

The Easy Ways to Download Facebook Videos on Android

The Easy Ways to Download Facebook Videos on Android
If you have an Android phone and an active user of Facebook, you must have wondered about the ways to download Facebook videos that appears on your timeline so that you can watch it over and over again without needing an internet connection.
Although, Facebook does not offer a direct link for you to download a video, but you can download the Facebook videos on your Android phone using a third-party app calledMyVideoDownloader, which is available for free on Google play store.
MyVideoDownloader for Facebook is the leading app to download videos from your Facebook to your Android device. It is very easy to use. With MyVideoDownloader, you can download any kind of videos from Facebook. Videos like tagged, shared and uploaded by you or your friends can be downloaded using this app. It is also allows you to download videos from the pages and groups you liked.

How to Use MyVideoDownloader for Facebook

  • Once installed, launch the app and log in to your Facebook account.
  • Swipe in to the right to access the menu. In the menu, select ‘News Feed’ to search for the video you want to download.
  • myvideodownloader for facebook screenshot 1
  • Once you have found a video you like, tap on the little tick icon beside the video you would like to download, and hit the download icon located on the top-right corner of the screen.
  • myvideodownloader for facebook screenshot 2
  • Your downloaded video will be saved to you phone’s SD card by default, but you can choose to save videos to your phone SD card from the Setting’s menu.

How to Unlock Android Phone If You Forgot the Password or Pattern Lock

How to Unlock Android Phone If You Forgot the Password or Pattern Lock
always a good idea to use a lock screen to protect your phone from unwanted access. Android has several options available for preventing others from accessing your device, including pattern, PIN, and password, etc. But what happen if you’re the one who can’t access your phone? Well, here I’ll show you how to regain access to your Android smartphone or tablet when you forget your PIN, password, or pattern lock.

How to Bypass Screen Lock

  1. Incorrectly enter your pattern for 5 times. On the fifth attempt, you will get a message informing you that you must wait for 30 seconds before you can try again. Tap ‘Next’ and a button will appear underneath the pattern grid that says ‘Forgot Pattern’. Tap on it.
  2. how to unlock android phone pic1
  3. Next, you’ll get an option to choose whether you want to unlock your phone through answering the security question that you might have set when you used your device for the very first time, or by entering your Google login details.
  4. how to unlock android phone pic2
  5. If you are using the security question, then simply type the answer of the question and unlock your device quickly. Otherwise check the Google account option and click ‘Next’. Now, provide your Google account username and password attached with your device and click on ‘Sign in’.
  6. how to unlock Android phone 3
  7. Once your security question answer or your Google ID is verified, you will be given an option to choose your new security lock, such as PIN code, pattern and password. Select the security option that you prefer and enter your new password or pattern.
  8. how to unlock Android phone 4
  9. That’s it! Now you will be able to use your new security lock to unlock your phone.
In addition to pattern lock, this method also work with the PIN and password lock screen security. As long as you know, your Google account credentials it’s not really a big deal if your forget. However, if you don’t know your Google account credentials, then you should do afactory reset in order to unlock your Android phone or tablet.

Recover Any Lost or Deleted Files from Android Phone with Wondershare Dr.Fone

Recover Any Lost or Deleted Files from Android Phone with Wondershare Dr.Fone
There are certain situations when you might accidentally delete some important files from your phone or the data might get lost due to virus attack, factory reset, system crashes, and so on. It can be really stressful to lose it especially when you realized that you didn’t have it backed up on your computer or external hard drive.
If you’ve accidentally lost important data on your Android phone, don’t panic because there’s a chance to get them back by using Dr.Fone for Android.
Dr.Fone for Android is a powerful Android data recovery program for PC developed by Wondershare Software Co., Ltd. The PC software is capable of recovering files such as contacts, messages, photos, videos, audio files, documents, WhatsApp history, as well as call history.
With Dr.Fone for Android, you can easily retrieve all your lost or deleted files from almost any Android phones and tablets from Samsung, LG, Sony, Motorola, HTC, Huawei, etc. You can see the complete list of supported devices from Wondershare’s official website here.

How to Recover Lost or Deleted Files by using Dr.Fone

Recovering deleted files with Dr.Fone app is very easy. Just follow the steps mentioned below and you’ll be able to recover deleted files from your Android device.
  1. Download and install the trial version of Dr.Fone on your PC. The trial version is only able to scan for deleted files. To recover the deleted files, you’ll need to buy the full version. It’s better if you use the trial version first in order to see if the app is working fine on your PC. Also, to see if there are any deleted files that can be recovered with the app.
  2. Launch the Dr.Fone app on your PC
  3. Enable USB Debugging on your Android device.
    • For Android 2.3 or earlier: Go to Settings -> Applications -> Development. Tick on “USB debugging”.
    • For Android 3.0 to 4.1: Go to Settings -> Developer options. Tick on “USB debugging”.
    • For Android 4.2 or newer: Go to Settings -> About Phone. Tap “Build number” for several times until getting a message “You are under developer mode”. Back to Settings ->Developer options. Tick on “USB debugging”.
  4. Connect your Android device to your PC using a micro USB cable. In case you do not have USB drivers installed, the software will automatically install it for you.
    dr.fone for android step 1
  5. Wait until your device is connected. Once it’s connected, the name of your device should appear in the top left corner of the app. Click on the ‘Start’ button to start analyzing your device for deleted files. If your device is not rooted, the program will directly start scanning your device. If your Android device has root access, tap on the ‘Allow’ button in the SuperUser message pop-up on your Android device.
  6. You would see all the types of files that can be recovered by the app. For saving time, select only the types of files that you need to recover and click ‘Next’.
    dr.fone for android step 2
  7. Since you want to find the deleted files only, choose the ‘Scan for deleted files’ mode and click ‘Next’. If you can’t find the deleted files with the Standard mode, then try the ‘Advanced mode’ but it may takes more time to scan.
    dr.fone for android step 3
  8. The software will start to scan for the deleted files on your Android device, and while the scanning process continues, the deleted files will be automatically appear under different tabs that are categorized according to their files types like Contacts, Messaging, WhatsApp, Gallery, Videos, Audio and Documents. You can always stop the scan if you already found the files that you need.
  9. Select the files that you want to recover by clicking on the checkbox next to each file name. You can also preview the file by tapping on a particular file and the preview will be available on the right. Files in Orange color are the ones that were deleted while the ones in Black color were available on your Android device. If you just want to display the deleted or lost data, just toggle ‘Only display deleted items’ to ON at the top of window.
    dr.fone for android step 4
  10. Click on the ‘Recover’ button after selecting your desired files. For registered users, you’ll get a popup asking for a location to save the recovered files.
    dr.fone for android step 5
  11. Click on the ‘Browse’ button, select the directory where you want the recovered files to be saved and press the ‘Recover’ button to start the recovery process. The app will now start recovering your selected files. Depending on the amount of files that you’re going to recover, this process will take several minutes.

Conclusion

Dr.Fone for Android is the perfect solution to recover any lost or deleted files from your Android devices. The full software costs about $49.95 (lifetime license and supports up to 5 devices) but it’s totally worth investing in. It’s simple to use, supports a wide array of files format and devices, and the most important is that it gives you peace of mind.
In addition, Wondershare also provide data recovery solutions for iOS, Windows, Mac, Camcorder/Camera, and Memory Card. For more details, you can see their official page here.